
什么是PATH环境变量,它有什么作用?
LANG PS1 PATH
######PATH含义
[root@oldboyedu01-nb ~]# echo $PATH
/usr/local/sbin:/usr/local/bin:/sbin:/bin:/usr/sbin:/usr/bin:/root/bin
第二个里程牌-liunx 下面运行命令过程
####1、输入命令
####2、在PATH里面 路径进行查找
####3、找到了就运行
####4、找不到就提示 command not found
第1题
如何过滤出已知当前目录下oldboy中的所有一级目录(提示:不包含oldboy目录下面目录的子目录及隐藏目录,即只能是第一级目录)?
mkdir /oldboy -p
cd /oldboy
mkdir ext/oldboy test xiaodong xingfujie -p
touch jeacen olaboy wodi.gz yingsui.gz
yum install tree -y
[root@oldboyedu01-nb oldboy]# #如何查询某个软件是否安装了?
[root@oldboyedu01-nb oldboy]# rpm -qa (查找所有安装软件)
[root@oldboyedu01-nb oldboy]# rpm -qa
[root@oldboyedu01-nb oldboy]# rpm -qa |grep tree (查找具体的软件安装包)
tree-1.5.3-3.el6.x86_64
[root@oldboyedu01-nb oldboy]# rpm -qa tree
tree-1.5.3-3.el6.x86_64
[root@oldboyedu01-nb oldboy]# rpm -qa |grep ipt
initscripts-9.03.58-1.el6.centos.x86_64
iptables-ipv6-1.4.7-16.el6.x86_64
plymouth-scripts-0.8.3-29.el6.centos.x86_64
iptables-1.4.7-16.el6.x86_64
[root@oldboyedu01-nb oldboy]# #查看某个软件包里面的内容
[root@oldboyedu01-nb oldboy]# rpm -ql tre
package tre is not installed
[root@oldboyedu01-nb oldboy]# rpm -ql tree (查看具体安装包里面的内容)
/usr/bin/tree
/usr/share/doc/tree-1.5.3
/usr/share/doc/tree-1.5.3/LICENSE
###方法1
[root@oldboyedu01-nb oldboy]# tree -d /oldboy/
/oldboy/
ext
oldboy
test
xiaodong
xingfujie
5 directories
[root@oldboyedu01-nb oldboy]#
[root@oldboyedu01-nb oldboy]# tree -dL 1 /oldboy/
/oldboy/
ext
test
xiaodong
xingfujie
##方法2
[root@oldboyedu01-nb oldboy]# find -type d
.
./ext
./ext/oldboy
./xiaodong
./test
./xingfujie
[root@oldboyedu01-nb oldboy]# find -maxdepth 1 -type d ! -name “.” (找出名字不是点)
./ext
./xiaodong
./test
./xingfujie
###方法3
[root@oldboyedu01-nb oldboy]# ls -l
total 28
-rw-r–r–. 1 root root 0 Jun 9 07:06 alex.txt
-rw-r–r–. 1 root root 292 Jun 9 06:34 ett.txt
drwxr-xr-x 3 root root 4096 Jun 22 21:55 ext
-rw-r–r– 1 root root 0 Jun 22 23:44 jeacen
-rw-r–r– 1 root root 0 Jun 22 23:44 olaboy
-rw-r–r–. 1 root root 0 Jun 9 07:06 oldboy.txt
drwxr-xr-x. 2 root root 4096 Jun 9 07:26 test
-rw-r–r–. 1 root root 8 Jun 9 07:26 test.sh
-rw-r–r–. 1 root root 8 Jun 9 07:26 t.sh
-rw-r–r– 1 root root 0 Jun 22 23:44 wodi.gz
drwxr-xr-x 2 root root 4096 Jun 22 21:55 xiaodong
drwxr-xr-x 2 root root 4096 Jun 22 21:55 xingfujie
-rw-r–r– 1 root root 0 Jun 22 23:44 yingsui.gz
[root@oldboyedu01-nb oldboy]# ls -l |grep “^d” (找出目录为d开头的文件)
drwxr-xr-x 3 root root 4096 Jun 22 21:55 ext
drwxr-xr-x. 2 root root 4096 Jun 9 07:26 test
drwxr-xr-x 2 root root 4096 Jun 22 21:55 xiaodong
drwxr-xr-x 2 root root 4096 Jun 22 21:55 xingfujie
[root@oldboyedu01-nb oldboy]#
#方法4
[root@oldboyedu01-nb oldboy]# ls -l|awk ‘$2>1’ (第二列大于1)
total 28
drwxr-xr-x 3 root root 4096 Jun 22 21:55 ext
drwxr-xr-x. 2 root root 4096 Jun 9 07:26 test
drwxr-xr-x 2 root root 4096 Jun 22 21:55 xiaodong
drwxr-xr-x 2 root root 4096 Jun 22 21:55 xingfujie
[root@oldboyedu01-nb oldboy]#
#第2题假如当前目录[root@oldboyedu01-nb oldboy]# pwd #==>这是打印当前目录的,最菜的命令
/oldboy
现在因为需要进入到/tmp目录下进行操作,执行的命令如下:
[root@oldboy oldboy]# cd /tmp/
[root@oldboy tmp]#pwd
/tmp/
操作完毕后,希望快速返回上一次进入的目录,即/oldboy目录,如何操作(不使用cd/oldboy)
[root@oldboyedu01-nb tmp]# #快速回到上一次的所在的位置/目录
[root@oldboyedu01-nb tmp]# cd –
/oldboy
[root@oldboyedu01-nb oldboy]# pwd
/oldboy
[root@oldboyedu01-nb oldboy]#
cd –
cd . =====当前目录 复制/移动 cp/etc/host.
cd.. =====进入到当前目录的上一级目录
cd~ =====进入当前用户的家目录,回老家
(root用户)~ ====/root
(普通用户)~ ====/home/
cd =====回老家 回家
cd – #快速回到上一次的所在位置/目录
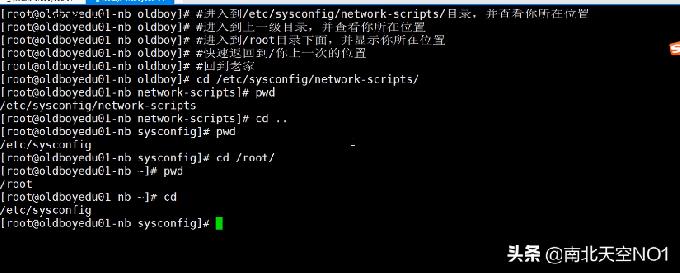
[root@oldboyedu01-nb oldboy]##进入到/etc/sysconfig/network-scripts/目录,并查看你所在的位置
[root@oldboyedu01-nb oldboy]#进入到上一级目录,并查看你所在位置
[root@oldboyedu01-nb oldboy]##进入到/root目录下面,并显示你所在位置
[root@oldboyedu01-nb oldboy]#回到老家
[root@VM-8-6-centos ~]# cd /oldboy/
[root@VM-8-6-centos oldboy]# cd /etc/sysconfig/network-scripts/
[root@VM-8-6-centos network-scripts]# pwd
/etc/sysconfig/network-scripts
[root@VM-8-6-centos network-scripts]# cd ..
[root@VM-8-6-centos sysconfig]# pwd
/etc/sysconfig
[root@VM-8-6-centos sysconfig]# cd /root/
[root@VM-8-6-centos ~]# pwd
/root
[root@VM-8-6-centos ~]# cd –
/etc/sysconfig
#第3题一个目录中有多文件(ls查看时好多屏),想最快速度查看到最近更新的文件,怎么查
ls -lrt
第5题 调试系统服务时,希望能实时查看系统日志/var/log/messages的更新,如何做?
tail -f 显示文件的实时更新
taillf ====tail -f
第4题 打印配置文件nginx.conf 内容的行号及内容,该如何做?
[root@oldboyedu01-nb oldboy]# echo {1..5}
1 2 3 4 5
[root@oldboyedu01-nb oldboy]# echo stu {01..10}
stu 01 02 03 04 05 06 07 08 09 10
[root@oldboyedu01-nb oldboy]# echo stu{01..10}
stu01 stu02 stu03 stu04 stu05 stu06 stu07 stu08 stu09 stu10
[root@oldboyedu01-nb oldboy]# echo stu{01..10}xargs -n1
stu01xargs stu02xargs stu03xargs stu04xargs stu05xargs stu06xargs stu07xargs stu08xargs stu09xargs stu10xargs -n1
[root@oldboyedu01-nb oldboy]# echo stu{01..10}|xargs -n1
stu01
stu02
stu03
stu04
stu05
stu06
stu07
stu08
stu09
stu10
[root@oldboyedu01-nb oldboy]# echo stu{01..10}|xargs -n1 >nginx.conf
[root@oldboyedu01-nb oldboy]# cat nginx.conf
stu01
stu02
stu03
stu04
stu05
stu06
stu07
stu08
stu09
stu10
[root@oldboyedu01-nb oldboy]#
###方法1
[root@oldboyedu01-nb oldboy]# cat -n nginx.conf (-n表示行号)
1 stu01
2 stu02
3 stu03
4 stu04
5 stu05
6 stu06
7 stu07
8 stu08
9 stu09
10 stu10
###方法2 -vi/vim
:set nu #显示行号 number
:set monu #取消小时行号
###方法3 -grep -n参数
[root@oldboyedu01-nb oldboy]# grep -n “stu” nginx.conf
1:stu01
2:stu02
3:stu03
4:stu04
5:stu05
6:stu06
7:stu07
8:stu08
9:stu09
10:stu10
[root@oldboyedu01-nb oldboy]# grep -n “.” nginx.conf
1:stu01
2:stu02
3:stu03
4:stu04
5:stu05
6:stu06
7:stu07
8:stu08
9:stu09
10:stu10
小结:
1.cat -n;vi/vim显示行号
2、grep -n
3、awk NR $ print
###第5题,装完系统后,希望让网络文件共享服务器NFS(iptables),仅在3级别上开机自启动,如何操作?
chkconfig iptables off
###第6题,liunx系统中查看中文,但是乱码,请问如何解决?
###原因:liunx使用字符集与原创连接工具的不同
解决:
方法1:推荐修改xshell 字符集
方法2:修改系统字符集
1:命令行 export LANG=en_us.utf-8
2.写入配置文件
cp /etc/sysconfig/i18n /etc/sysconfig/i18n.bat
echo ‘LANG=en_us.UTF-8′>/etc/sysconfig/i18n
3、生效
source /etc/sysconfig/i18n
###第7题; /etc/目录为liunx系统默认的配置文件及服务启动命令的目录
a、请用tar 打包/etc整个目录(打包及压缩)
b、请把a点命令的压缩包,解压到/tmp指定目录下(最好只用tar命令实现)
c、请用tar打包/etc整个目录(打包及压缩,但需要排除/etc/services文件)。
tar 创建查看解压压缩包
[root@oldboyedu01-nb oldboy]# tar zcvf /tmp/etc.tar.gz /etc/
创建压缩包 压缩包存放的位置 压缩能够目录
zcvf注释:
z—-通过gzip工具进行压缩 ,
c—–表示create创建 压缩包 ,
v—表示verbose显示执行过程
f—–显示file 接上压缩包的名字
[root@oldboyedu01-nb oldboy]# ls -l /tmp/ (查看文件)
total 9508
-rw-r–r– 1 root root 9736182 Jun 23 05:48 etc.tar.gz
查看压缩包的内容
[root@oldboyedu01-nb oldboy]# tar ztf /tmp/etc.tar.gz
ztf注释: t—-表示list 显示压缩包的内容
解压
[root@oldboyedu01-nb oldboy]# cd /tmp/
[root@oldboyedu01-nb tmp]# tar zxf etc.tar.gz (解压)
创建
tar zcf
查看
tar tf
解压
tar xf
[root@oldboyedu01-nb tmp]# tar zxf etc.tar.gz
[root@oldboyedu01-nb tmp]# tar zcf /tmp/sysconfig.tar.gz /etc/sysconfig/
tar: Removing leading /’ from member names tar: Removing leading /’ from hard link targets
[root@oldboyedu01-nb tmp]# tar tf /tmp/sysconfig.tar.gz
[root@oldboyedu01-nb tmp]# ls -l
total 9568
drwxr-xr-x 78 root root 4096 Jun 23 03:39 etc
-rw-r–r– 1 root root 9736182 Jun 23 05:48 etc.tar.gz
-rw-r–r– 1 root root 53851 Jun 23 06:00 sysconfig.tar.gz
[root@oldboyedu01-nb tmp]# rm -fr etc
do not use rm -fr etc
[root@oldboyedu01-nb tmp]# ll
total 9568
drwxr-xr-x 78 root root 4096 Jun 23 03:39 etc
-rw-r–r– 1 root root 9736182 Jun 23 05:48 etc.tar.gz
-rw-r–r– 1 root root 53851 Jun 23 06:00 sysconfig.tar.gz
[root@oldboyedu01-nb tmp]# rm -fr etc
[root@oldboyedu01-nb tmp]# ll
total 9564
-rw-r–r– 1 root root 9736182 Jun 23 05:48 etc.tar.gz
-rw-r–r– 1 root root 53851 Jun 23 06:00 sysconfig.tar.gz
[root@oldboyedu01-nb tmp]# tar xf sysconfig.tar.gz
[root@oldboyedu01-nb tmp]# ll
total 9568
drwxr-xr-x 3 root root 4096 Jun 23 06:02 etc
-rw-r–r– 1 root root 9736182 Jun 23 05:48 etc.tar.gz
-rw-r–r– 1 root root 53851 Jun 23 06:00 sysconfig.tar.gz
[root@oldboyedu01-nb tmp]# ls etc
sysconfig
[root@oldboyedu01-nb tmp]# ls etc
sysconfig
[root@oldboyedu01-nb tmp]# ls etc/sysconfig/
acpid i18n kernel quota_nld sshd
atd init keyboard raid-check sysstat
auditd ip6tables modules readahead sysstat.ioconf
authconfig ip6tables-config netconsole readonly-root system-config-firewall
cbq ip6tables.old network rngd system-config-firewall.old
clock iptables networking rsyslog udev
console iptables-config network-scripts sandbox
cpuspeed iptables.old ntpd saslauthd
crond irqbalance ntpdate selinux
grub kdump prelink smartmontools
请把A点命令的压缩包,解压到/tmp指定目录下(最好用tar命令实现)
[root@oldboyedu01-nb tmp]# tar xf etc.tar.gz -C /opt/ (指定目录)
[root@oldboyedu01-nb tmp]# ls -l /opt/ (查看解压后的目录情况)
请用tar打包/etc整个目录(打包及压缩,但需要排除/etc/services文件)
[root@oldboyedu01-nb tmp]# tar zcf /tmp/etc.tar.gz /etc/
tar: Removing leading `/’ from member names
tar: Removing leading `/’ from hard link targets
[root@oldboyedu01-nb tmp]#
[root@oldboyedu01-nb tmp]# tar zcf /tmp/etc-paichu.tar.gz /etc/ –exclude=/etc/services
tar: Removing leading `/’ from member names
tar: Removing leading `/’ from hard link targets
[root@oldboyedu01-nb tmp]# tar zcf /tmp/etc-paichu.tar.gz /etc/ –exclude=/etc/services
tar: Removing leading `/’ from member names
tar: Removing leading `/’ from hard link targets
[root@oldboyedu01-nb tmp]# tar tf /tmp/etc.tar.gz |grep services
etc/init/readahead-disable-services.conf
etc/services
[root@oldboyedu01-nb tmp]# tar tf /tmp/etc-paichu.tar.gz|grep services
etc/init/readahead-disable-services.conf
[root@oldboyedu01-nb tmp]#
cd /
tar zcf /tmp/etc.tar.gz etc/
小结:
1、tar 打包压缩
2、创建压缩包 查看压缩包, 解压
3、解压到指定的文件夹
4、创建压缩包排除
#第8题如何查看etc/services文件的有多少行?
[root@oldboyedu01-nb ~]# cd /oldboy/
[root@oldboyedu01-nb oldboy]# wc -l /etc/services
10774 /etc/services、
屌丝去洗浴中心之路
3、
(1)查看22端口是否开启telnet
(2)sshd远程连接进程是否在运行
ps -ef
[root@oldboyedu01-nb oldboy]# ps -ef |grep “sshd” (过滤进程sshd)
root 1436 1 0 Jun22 ? 00:00:00 /usr/sbin/sshd
root 2461 1436 0 05:11 ? 00:00:00 sshd: root@pts/0
root 2588 1436 0 06:45 ? 00:00:00 sshd: root@pts/1
root 2656 1436 0 07:30 ? 00:00:00 sshd: root@pts/2
root 2701 2658 0 08:01 pts/2 00:00:00 grep sshd
[root@oldboyedu01-nb oldboy]# ps -ef |grep “/sshd”
root 1436 1 0 Jun22 ? 00:00:00 /usr/sbin/sshd
root 2705 2658 0 08:03 pts/2 00:00:00 grep /sshd
[root@oldboyedu01-nb oldboy]# ps -ef |grep “/sshd”|wc -l (显示进程出现几个;次数)
2
第9题:过滤出/etc/services 文件包含3306和1521两数字所在行号的内容
[root@oldboyedu01-nb oldboy]# grep “3306” /etc/services
mysql 3306/tcp # MySQL
mysql 3306/udp # MySQL
[root@oldboyedu01-nb oldboy]# egrep “3306|1521” /etc/services
mysql 3306/tcp # MySQL
mysql 3306/udp # MySQL
ncube-lm 1521/tcp # nCube License Manager
ncube-lm 1521/udp # nCube License Manager
[root@oldboyedu01-nb oldboy]# #egrep ==grep -E支持高级正则(公鸡里的战斗机)
[root@oldboyedu01-nb oldboy]#
第10题命令行及shell中不加引号、加单引号和加双引号的区别小结
单引号 所见即所得 吃啥吐啥
双引号 里面的特殊符号会被解析
[root@VM-8-6-centos oldboy]# echo ‘hello lls $LANG $(hostname) ‘pwd”
hello lls $LANG $(hostname) pwd